Category: Bedrooms

  • Changing Sheets When Your Bed Is Against the Wall

    Changing Sheets When Your Bed Is Against the Wall

    The fitted sheet has popped off the far corner again, and fixing it means leaning across the mattress with one knee tangled in the comforter. When a bed sits against the wall, an ordinary bedding change becomes a series of awkward reaches. You may not need a different bed—or even room to walk around it. The useful changes are smaller: check what can move safely, prepare the sheet before spreading it, and tackle the least accessible parts while the fabric is still loose.

    A tape measure spans the working aisle beside a wall-side bed under the headline Sheets Without the Struggle.

    1. Find out whether the frame can safely move

    Before pulling the bed away from the wall, identify the frame and check its manufacturer’s instructions. A freestanding frame may permit repositioning; a wall-attached headboard, storage bed, adjustable base, or frame with vulnerable center supports needs different handling. Never move an occupied bed. Keep children and pets out of the working area, and check for cords or attachments before attempting any permitted movement.

    Measure the room, furniture, door swings, and proposed access route first. Mark a possible new frame position with removable tape: even a few inches may improve hand access, but it is not necessarily enough room to stand. These are planning checks, not code clearances. If movement would obstruct an exit, ventilation, or a heater’s required clearance, leave the bed where it is and use the stationary methods below.

    2. Fit the wall-side corners while the sheet is loose

    Start the fitted sheet at the hardest-to-reach corner, usually the wall-side corner near the headboard. Fit the wall-side foot corner next, then finish the two accessible corners. Leaving the near side loose gives you more fabric to guide over the far edge instead of pulling against elastic already stretched tight. Lay the sheet across the mattress first so you are not wrestling its full weight at arm’s length.
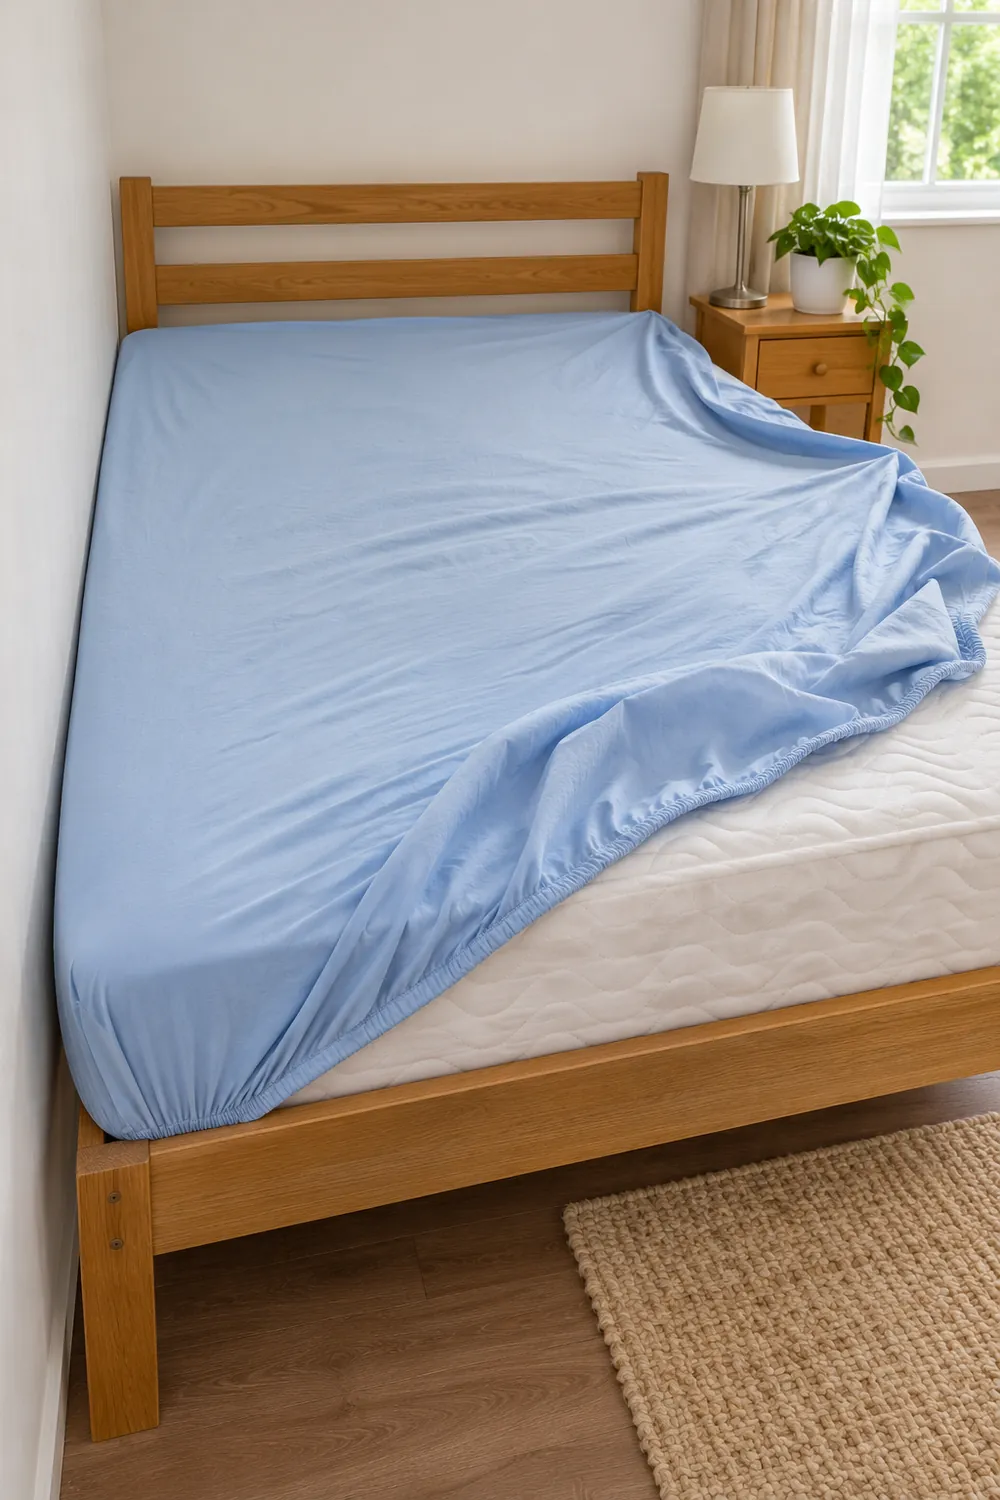
    Wall-side sheet corners are fitted while accessible-side fabric remains loose.

    If only one far corner is difficult, do that one first rather than following a fixed clockwise route. Smooth the fabric along the wall before securing the near side. This order reduces resistance; it does not make an unreachable corner reachable. If you cannot reach it without climbing, twisting, or straining, stop and arrange safe access or help rather than forcing the last few inches.

    3. Match fitted-sheet pockets to the whole mattress stack

    Measure the mattress height with any topper and mattress pad you normally use in place. Compare that total with the sheet maker’s stated fit range, not just a “deep pocket” label. A 12-inch mattress with a 3-inch topper needs a sheet that accommodates the combined height. Check width and length, too: full and queen sheets are not interchangeable.

    A shallow pocket can pull the far corner loose as you secure the near one, making your fitting order seem ineffective. Excessively roomy sheets can bunch, so the deepest available pocket is not automatically best. Before replacing anything, confirm that the topper is centered and the sheet is oriented correctly. If it still cannot wrap beneath the corners without excessive force, choose a better-fitting set.

    4. Identify the head and foot before spreading the sheet

    Check for a “top/bottom” or “side” label while the sheet is still in your hands. Some sheets have these helpful markers; others have only a care tag, whose location is not universal. Establish the correct direction before reaching toward the wall. On a rectangular mattress, turning the sheet a quarter-turn can leave one direction strangely tight and the other full of slack.
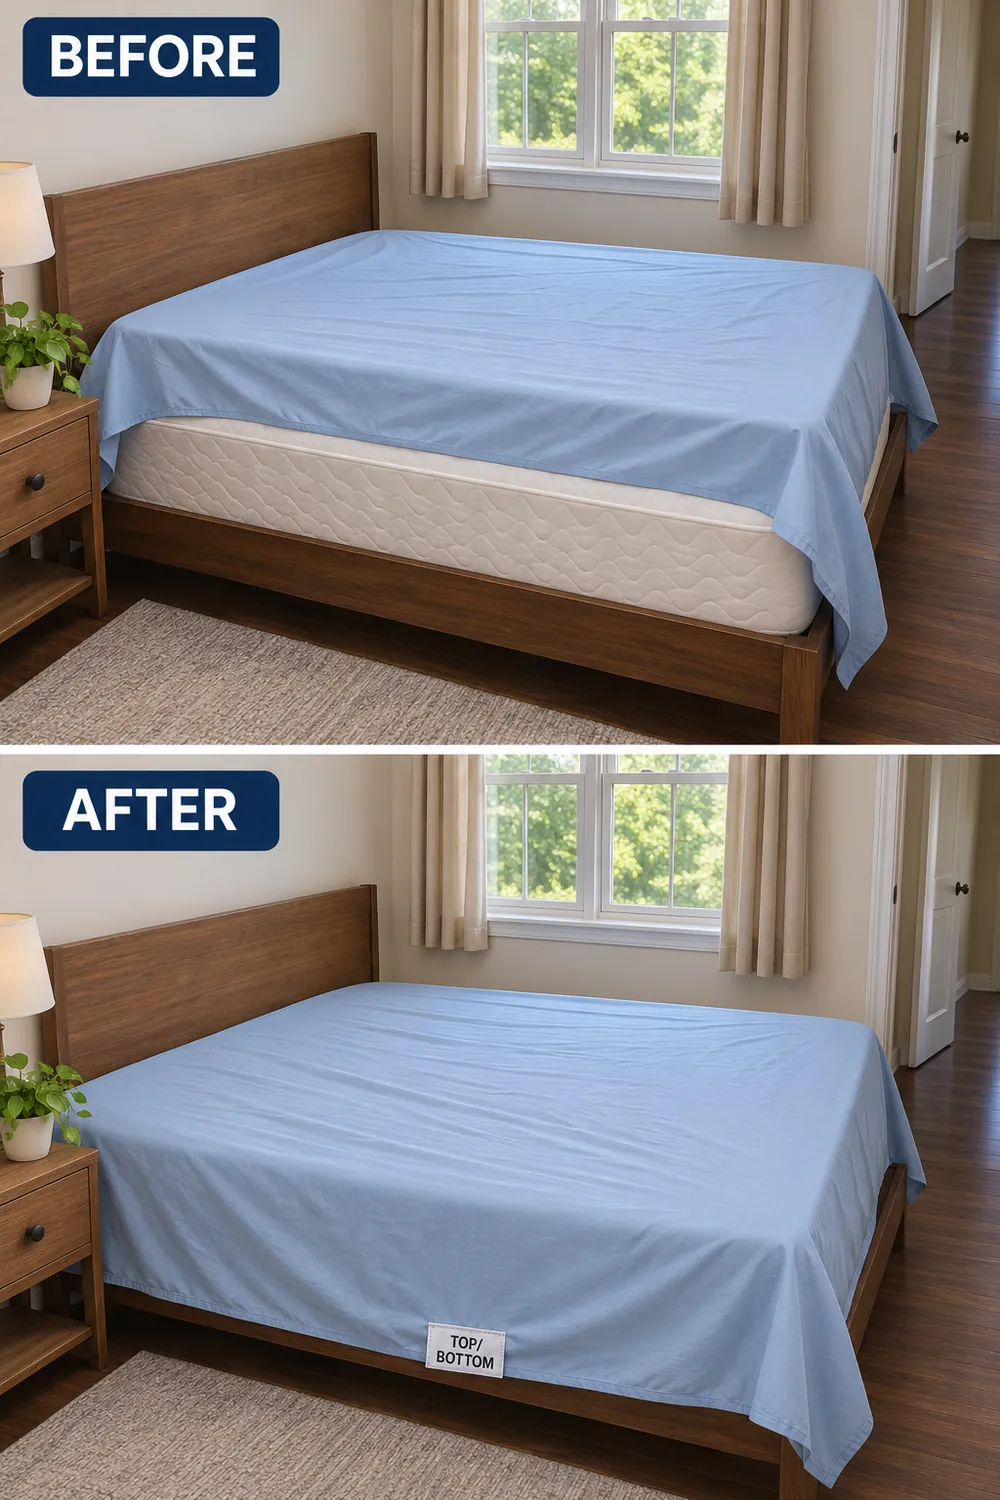
    Before and after correcting sheet orientation with a visible top-bottom label.

    For an unmarked set, identify the correct orientation once and add a small washable fabric-marker dot inside the foot-end hem, following the marker’s instructions. Keep that mark consistent across your sets. Folding the sheet with the marked edge visible also saves searching next time. Do not assume every manufacturer puts its care label in the same corner.

    5. Protect the floor before any permitted movement

    If the frame can move safely, inspect every floor-contact point before shifting it. Grit beneath a foot can scratch a hard floor; an unnoticed center leg can catch as the frame moves. Use floor protection appropriate to both the flooring and the frame, following their care instructions. Carpet sliders and hard-floor protectors are not automatically interchangeable.

    Installing a protector may itself require lifting the frame, so do not attempt it unless that can be done safely with suitable help. Avoid improvised towels that can slip or snag beneath narrow legs. Move only as permitted, without yanking the headboard or dragging unsupported center legs. After returning the bed, check that its supports are upright and stable before anyone gets back in.

    6. Use a small, controlled corner lift—not a blind reach

    When a reachable corner needs its elastic eased underneath, lift only that mattress corner enough to guide the sheet around it, then lower it slowly. Work from stable footing and keep your hands clear as it settles. The aim is to expose the lower edge briefly, not to hold up a large section of mattress while fishing beneath it.

    Try this only if the mattress instructions allow it and the movement is comfortably within your abilities. A thick or floppy mattress may be too difficult to control alone. Do not wedge it up with household objects, reach beneath moving bed mechanisms, or try to lift the entire mattress to reach the wall side. If the corner resists, stop and recruit help.

    7. Put the duvet cover on from the open side

    Use the accessible edge as your duvet-cover work area. Turn the cover inside out and reach inside to grasp its two closed-end corners. Holding the corresponding insert corners through the fabric, turn the cover over the insert in manageable sections on the mattress. Secure internal ties if provided. Keep the opening near you until the insert is spread and the closure is fastened.
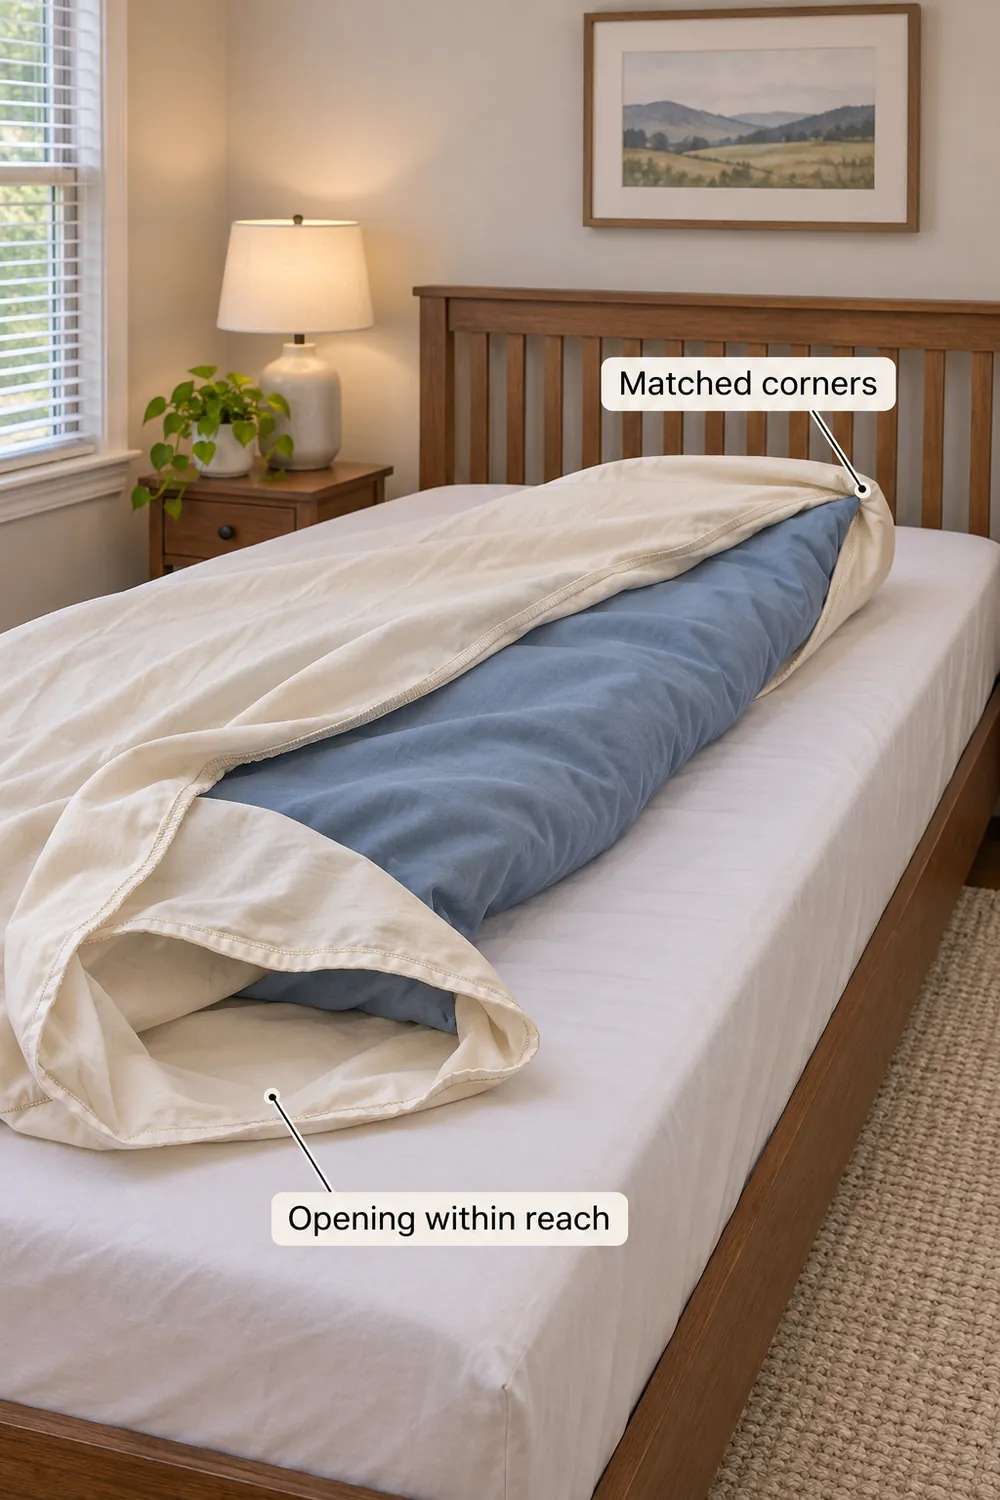
    A duvet cover and insert rest on the mattress with matched corners and an accessible opening.

    Straighten the filled cover on the bed before pushing its far edge toward the wall. There is no need to shake a large duvet overhead in a narrow aisle. If the insert is bulky, work half the cover over at a time or share the task. This method keeps the floor clear, but it still requires patience when the insert bunches inside the cover.

    8. Remove layers that create work without adding comfort

    Look at what actually comes off the bed each night. Decorative pillows, a folded throw, and an unused blanket all add handling before you even reach the sheet. Keep the layers that serve your sleeping habits and remove the extras. Two sleeping pillows and one preferred cover may be a more workable everyday setup than a bed that needs dismantling.

    The compromise is laundering: skipping a flat sheet generally puts more direct contact on the duvet cover, so plan to wash that cover accordingly. Keeping a flat sheet may suit you better if wrestling a duvet cover is the hardest task. Do not remove a mattress protector simply to save a step; distinguish useful protection from purely decorative layers.

    9. Agree on a two-person method for a heavy mattress

    For a mattress that is difficult to handle, agree on roles before starting. One person controls a small, permitted corner lift while the other guides the elastic, keeping fingers out from underneath as the mattress lowers. Use simple cues such as “ready,” “lift,” and “lower.” Both people need stable footing and clear access; nobody should squeeze into a gap where they cannot move freely.

    An adult helper might manage the accessible foot corner while you position the sheet, then swap tasks if needed. Two people do not make an unsafe maneuver safe, and a helper cannot compensate for having nowhere to stand. If wall-side access remains impossible, use manufacturer-approved repositioning or seek suitable assistance. Do not tip a heavy mattress upright or bend it contrary to its instructions.

    10. Stage the change so clean bedding never needs the floor

    Bring in the clean set before stripping the bed, but leave it folded on a clean chair outside the working aisle. Put a laundry hamper within reach. Remove decorative layers first, send dirty pillowcases and sheets straight into the hamper, then replace the fitted sheet before unfolding the larger covers. This keeps your one usable side from becoming a pile you must step over.
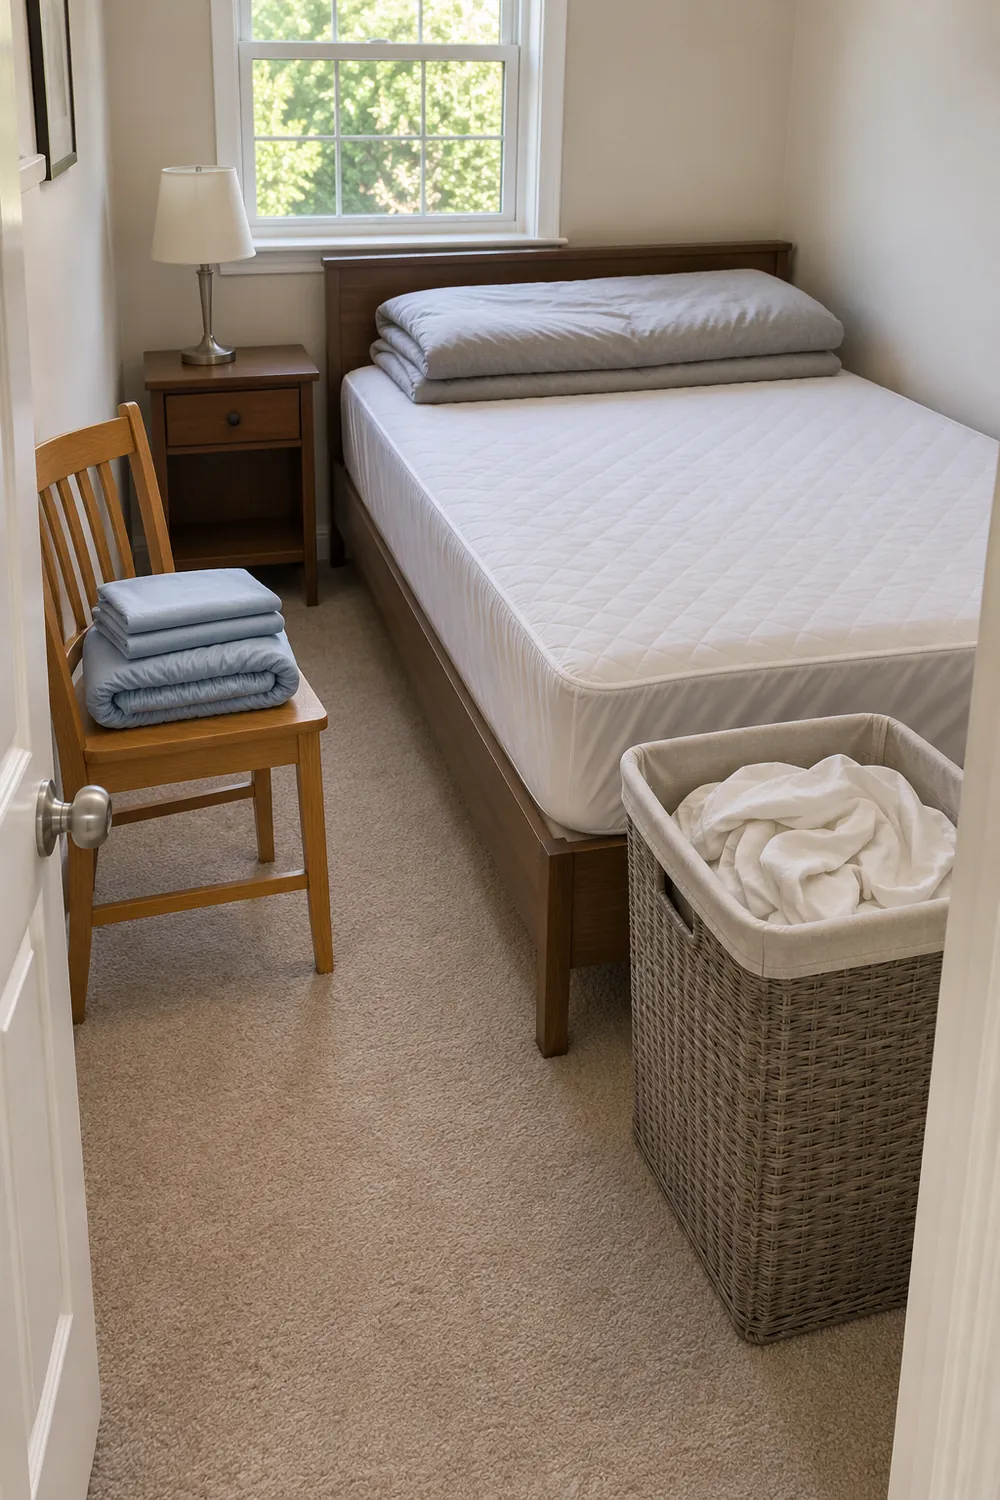
    Clean linens on a chair and used bedding in a hamper beside a wall-side bed.

    If there is no spare chair, bring clean pieces from another room as needed rather than balancing them on the hamper. A compact retained cover can wait on a clean surface until the fitted sheet is secure. Keeping one complete replacement set together also reduces interruptions; these ways to make stored bedding easier to find can help if locating matching pieces regularly stalls the job.

    For the next change, start with two adjustments: identify the sheet’s orientation before spreading it, and fit the hardest corner first. If that corner still requires strain, make safe access or suitable help your next priority—not a stronger tug.


  • Where to Put Clothes You Have Worn but Are Not Ready to Wash

    Where to Put Clothes You Have Worn but Are Not Ready to Wash

    The jeans on the chair are still wearable. The sweater over them needs airing, and somewhere underneath is yesterday’s T-shirt, which probably belongs in the hamper. Once those decisions share one seat, getting dressed becomes an excavation. A between-wears system gives these clothes a temporary address—not another permanent storage area. Choose one main holding spot, add a place to air garments, and give everything a deadline.

    Hands sort worn clothes into rewear, airing, and laundry destinations beneath the headline “Wear It Again.”

    1. Decide what qualifies for another wear

    Before choosing storage, establish a rewear test: Is the garment dry, free of noticeable odor, and free of stains or visible dirt? Check the underarms, collar, and cuffs rather than judging the whole shirt from a distance. Jeans worn for a quiet evening might pass; a shirt with a food spill needs attention, even if you wore it for only an hour.

    Send underwear, sweaty base layers, and anything you would hesitate to put back on straight to the laundry stream. Follow care labels when a garment needs spot treatment or special cleaning. Airing is useful for assessing a piece after wear, but it does not remove dirt. If you keep reconsidering the same questionable top, washing it is usually simpler than storing the uncertainty.

    2. Give clean and previously worn clothes separate addresses

    Create a visible boundary between freshly washed clothing and pieces awaiting another wear. That could mean two dedicated hooks beside the dresser for worn shirts while clean clothes stay inside the closet. As a rough starting point, place hook centers about 8–12 inches apart, then test with your actual garments: a broad sweater needs more room than a narrow camisole.

    Two spaced hooks hold worn garments outside a wardrobe, separate from clean shirts hanging inside.

    The boundary matters more than matching containers. In a shared bedroom, assign each person a hook or short section of rail so one person’s outfit does not swallow the other’s space. Avoid returning worn pieces to random gaps among clean clothes; that makes their status invisible. A small, clearly understood zone also shows when you have more waiting clothes than you can realistically rewear.

    3. Air garments before putting them away

    Let clothing release body warmth and moisture before folding it into your holding spot. Hang a shirt with its front open, or spread a sweater over a suitable drying rack rather than bunching it on a knob. A place you pass while getting ready for bed works well: you can check the garment again before transferring it to its designated zone.

    There is no useful universal airing time; fabric, room conditions, and how you wore the item all matter. Check that it feels fully dry, including thicker seams, before storing it. Keep the airing station away from heaters, supply vents, and exit paths. Heavy knits may stretch on hangers, so follow their care instructions and support them appropriately instead of hanging everything the same way.

    4. Use a valet stand for one outfit, not a wardrobe

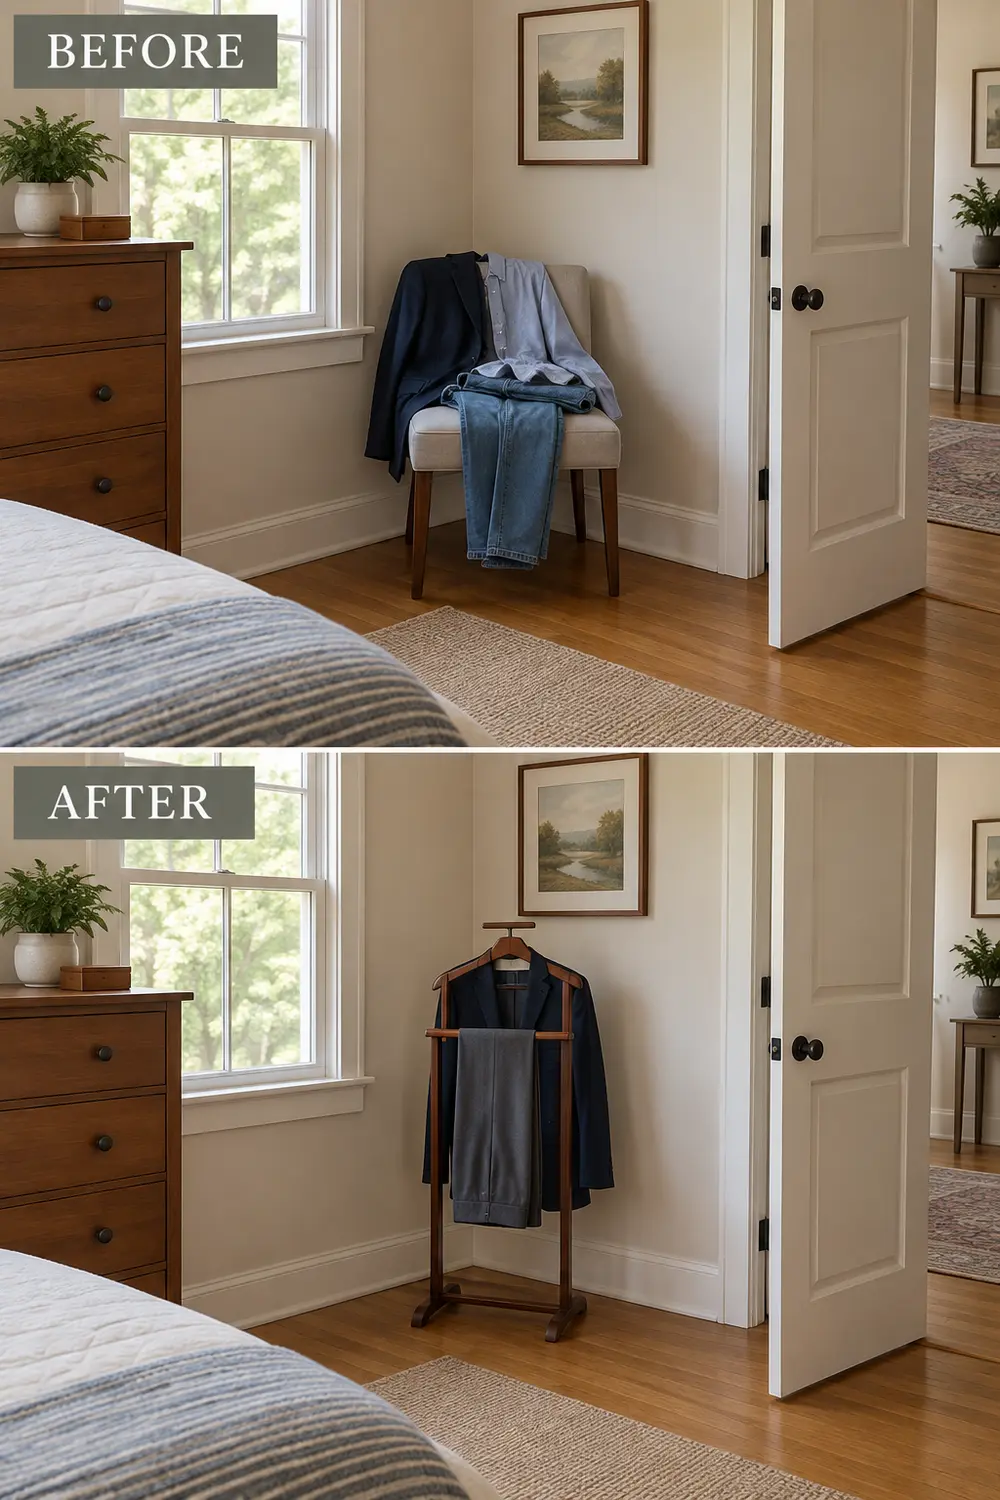
    A valet stand can replace the chair pile when you regularly rewear the same trousers and jacket. Put the jacket on its shaped support and the trousers over a separate bar, leaving each piece accessible. Its advantage is visibility: you can see tomorrow’s outfit without uncovering it. Treat the stand as space for one outfit, not permission to start a taller pile.

    Before, clothes overlap on a chair; after, a valet stand holds one jacket and one pair of trousers separately.

    Check the stand’s full footprint and stability before buying; projecting feet can take more floor space than the upright suggests. Measure the room, furniture, door swings, and your route around the bed. If that corner already interferes with closet access, address the conflict with these small-bedroom closet clearance fixes rather than squeezing in another freestanding object.

    5. Reserve hooks for garments that can hang loosely

    Hooks work best when each one holds a single suitable garment, not a stack of sleeves. Use sturdy hanging loops where provided, and choose broad, rounded hooks for pieces that tolerate them. A lightweight overshirt can wait beside the closet; a delicate knit may be better folded. Leave enough space that neighboring clothes do not press together and hide what is underneath.

    For rentals, an over-door rack may avoid drilling, but check that the door closes freely and follow the rack’s load limits. Adhesive hooks also have surface and weight restrictions; they are not automatically damage-free. Keep hanging hems off the floor and clear of handles. If a robe already fills the back of the door, adding four shirts creates another pile, just upright.

    6. Hang trousers where each pair stays reachable

    Give rewearable trousers individual hangers or separate bars so removing one pair does not disturb three others. Fold jeans once over a sturdy hanger bar; hang dress trousers in a way that preserves their existing crease. Reserve a clearly defined end of a rail for worn pairs, with a divider or gap separating them from freshly cleaned clothing.

    A multi-tier hanger saves width, but closely packed bars can make lower pairs awkward to retrieve. Test it with your heaviest jeans before committing your whole system to it. For a daily rotation, two easy-to-reach pairs may be more useful than five tightly layered ones. Do not hang trousers from a door handle, where the fabric can interfere with opening and closing.

    7. Reserve a shallow drawer for dry folded pieces

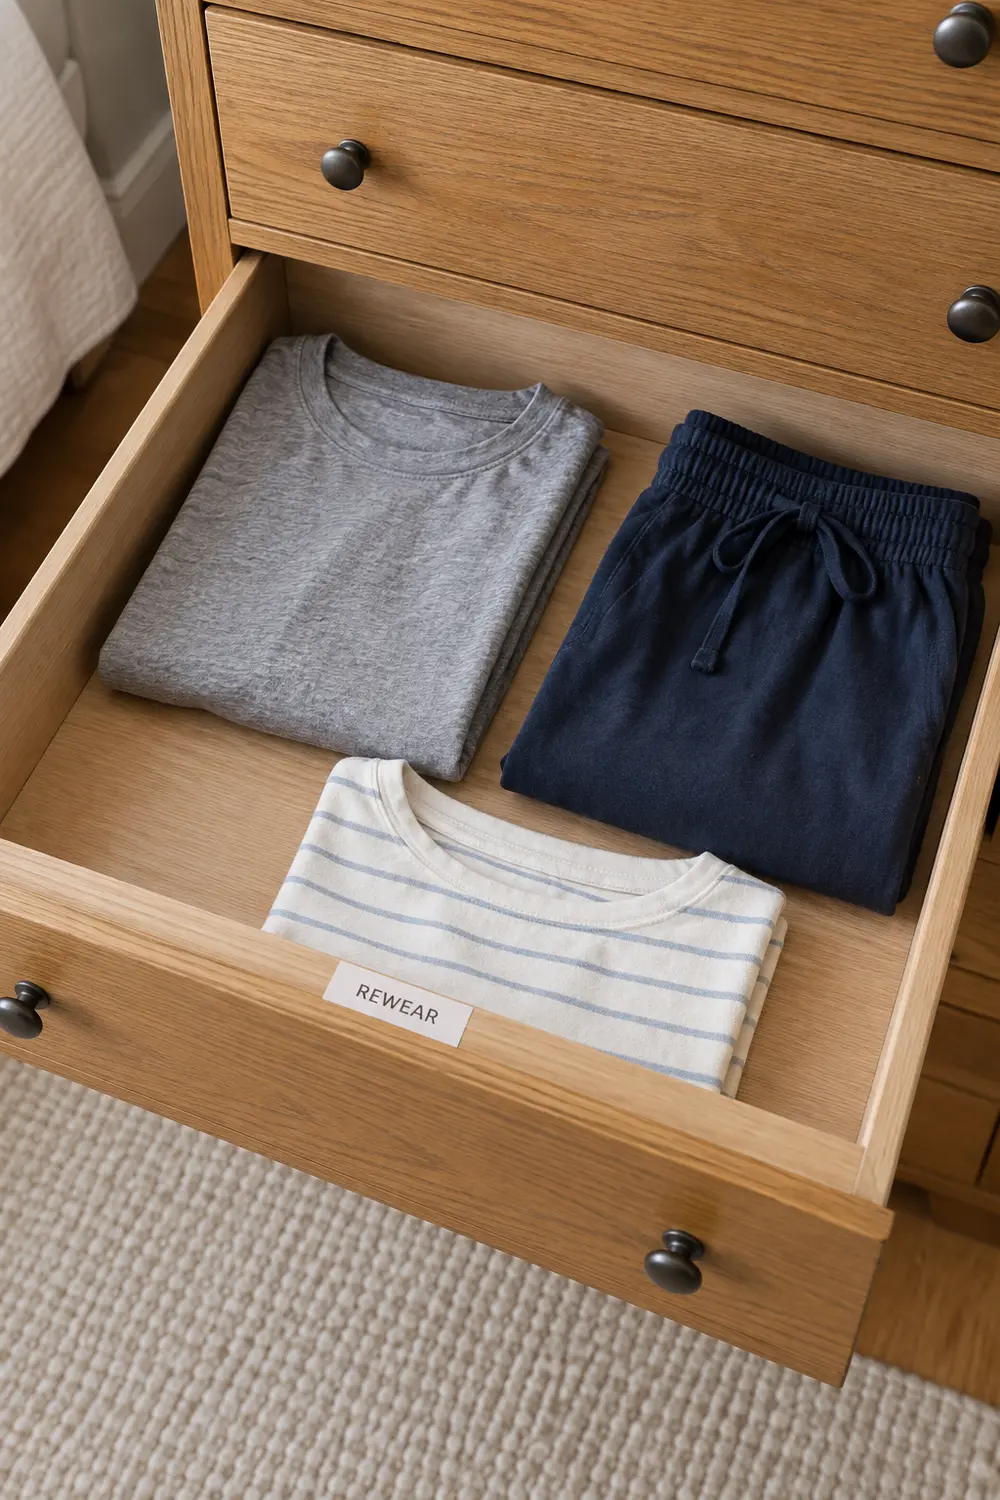
    If you dislike visible clothing, dedicate one shallow drawer to fully dry, aired pieces that passed your rewear test. Fold them in a single layer or short upright row so every item remains identifiable. A casual T-shirt and soft lounge pants might fit comfortably; a deep stack of sweaters makes this temporary drawer as difficult to read as the chair pile.

    A shallow drawer labeled “REWEAR” holds three folded garments in one visible layer.

    This approach costs you a drawer that could hold clean clothing, so try it with your smallest practical compartment first. Keep freshly washed items elsewhere and empty the drawer during your weekly reset. An enclosed drawer is not an airing station: putting warm or damp clothes inside defeats the purpose. If you cannot spare a drawer, a shallow open tray on an existing shelf provides a similar boundary.

    8. Give sleepwear its own small spot

    Sleepwear follows a different rhythm from clothes you wear outside, so keep it out of the main rewear zone. Let pajamas air after you get up, then fold them into a small bedside basket or a dedicated corner of a shelf. That keeps tonight’s sleep shirt easy to find without mixing it into tomorrow’s jeans and work clothes.

    Limit this spot to the set currently in use; clean replacements belong with clean laundry. Avoid tucking worn pajamas beneath a pillow while they are still warm or damp. If bedside space is already crowded, borrow an idea from these bedside storage solutions for bedrooms without nightstands, choosing a reachable shelf or pocket rather than adding furniture beside the bed.

    9. Route damp exercise clothes toward laundry

    Sweaty workout clothes need a separate route, not a place among tomorrow’s outfits. If you are not washing them immediately, spread them over a washable drying rack or dedicated rail until dry, then transfer them to the hamper. Keep this drying position separate from the rail used for rewearable shirts so the two categories remain unmistakable.

    Do not seal damp leggings and socks in a gym bag or tuck them beneath dry laundry. A bathroom may be convenient only if there is room and ventilation; clothes should not block a fan, heater, doorway, or someone’s access to fixtures. The inconvenience is real: this requires a temporary drying spot. A foldable rack you put away afterward may be the most workable compromise.

    10. Set a weekly return-or-wash deadline

    Choose one repeatable moment—before your weekend laundry load, for instance—to empty the between-wears zone. Pick up every item and decide: wear it next, wash or clean it, or return it to regular storage if it is still suitable. Refold the keepers and clear the supports. The goal is a deliberate decision, not moving the entire pile somewhere less visible.

    A person clears the rewear station by placing a shirt in the hamper and keeping one folded pair of jeans.

    If the zone overflows before that deadline, reduce what you keep or reset more often rather than automatically adding storage. Clothes left untouched for several resets probably do not need a permanent halfway home. Like other daily drop zones that keep collecting clutter, this spot needs a next step for its contents, not just a tidier container.

    Start with the clothes on the chair tonight. Send definite laundry to the hamper, air the plausible rewears, and choose one existing hook, rail section, or drawer as their destination. Set the reset day before adding any new storage.

  • Sleeping After Sunrise in a Small Rental Bedroom

    Sleeping After Sunrise in a Small Rental Bedroom

    You finally get into bed, but sunlight outlines the curtains, a charger glows beside your pillow, and someone rolls a suitcase down the hallway. Daytime sleep calls for more than dark fabric. In a small rental, the useful approach is to tackle the light that reaches your pillow, the sounds you can control, and the routines that keep waking you—without making the bedroom difficult to ventilate or leave.

    Daylight leaks around bedroom curtains and beneath a door during a light audit, with the headline “Find the Light Leaks.”

    1. Map the light from your pillow

    Check the bedroom near your actual bedtime, not just when you get home. Close the door and existing curtains, switch off lamps, and lie where your head normally rests. Give your eyes a few minutes to adjust. Note the bright spots: a curtain seam, a window corner, the door bottom, or a device facing the bed.

    Separate steady leaks from interruptions. A stripe beside the window needs a different fix from light appearing whenever a roommate opens the hallway closet. Repeat the check later if your sleep spans several daylight hours; the sun’s angle changes. Start with the brightest source visible from the pillow rather than trying to make every surface equally dark.

    2. Fit a removable blackout panel to the window

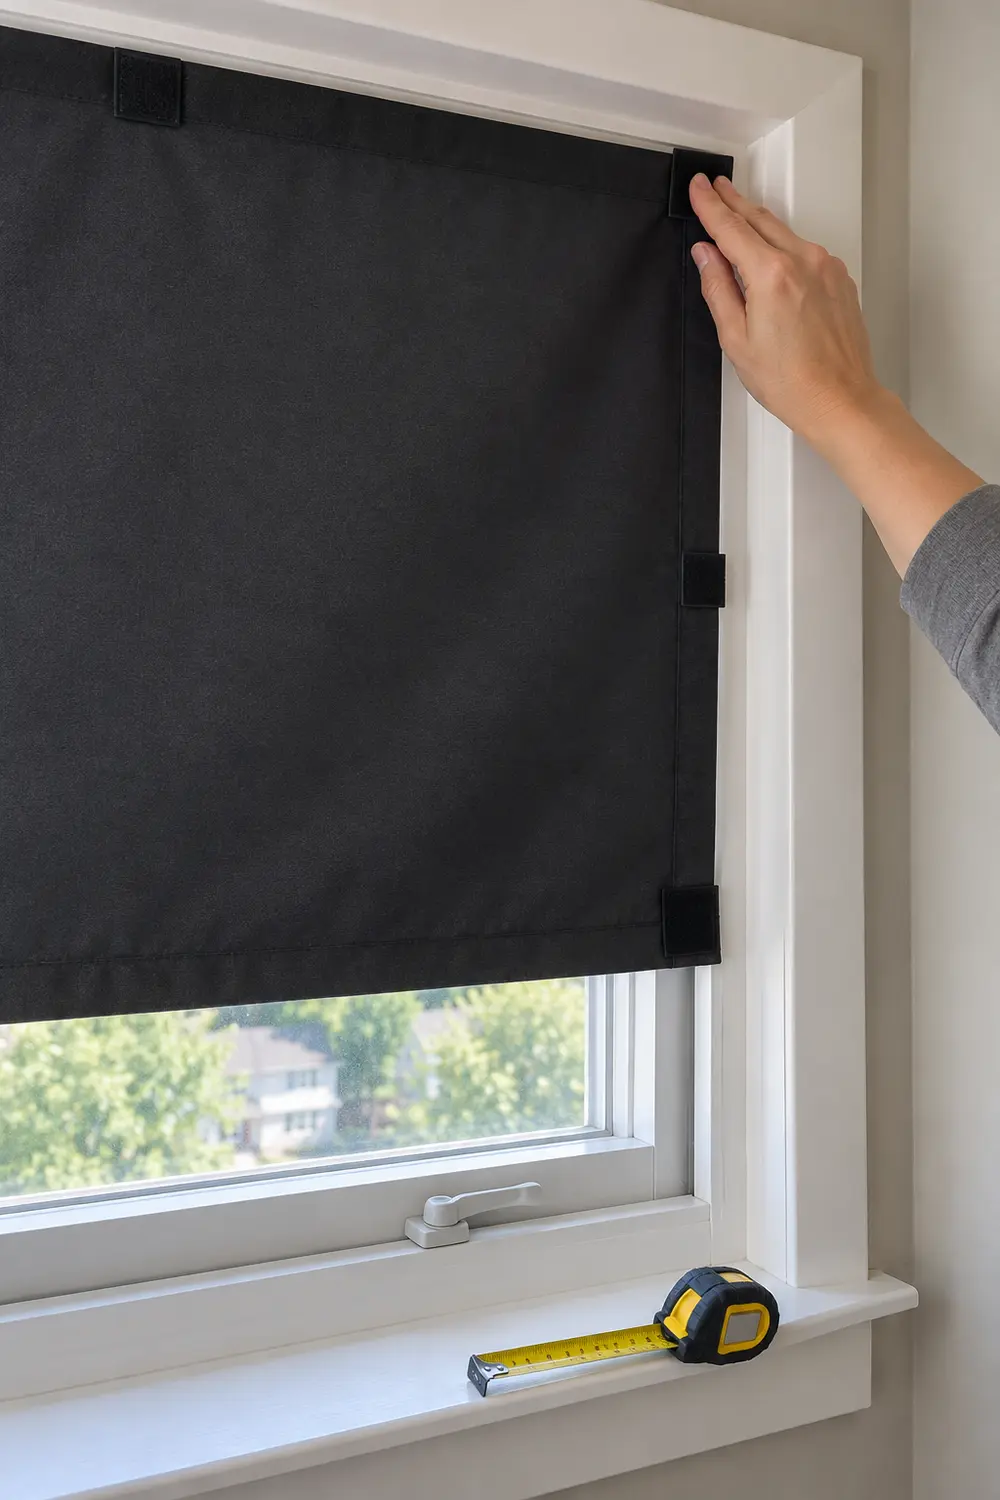
    A removable blackout panel can address glass that existing blinds leave exposed. Measure the opening at several points and follow the panel system’s instructions for sizing and attachment. With a surface-mounted fabric panel, the opaque material should extend beyond the glass without gaps at its fasteners. Test the fit in daylight before committing to a second window.

    A hand fits a removable blackout panel over window glass, showing edge coverage and small attachment tabs.

    Choose attachments rated for the panel’s weight and compatible with the surface; removable adhesive can still lift paint. Check rental restrictions and removal directions first. Light control is not ventilation: don’t cover vents or assume a covered window can provide airflow. Keep operating hardware accessible, and any emergency-escape window readily usable without tools or furniture moving.

    3. Turn off small lights before covering them

    A charger’s blue dot can become surprisingly noticeable once the window is dark. Look for settings that disable indicator lights or dim a clock display before adding anything. Turn a digital clock away from the pillow if you don’t need to read it while sleeping. Put a phone face down and configure its notification settings to prevent screen wake-ups.

    For an ordinary status LED that cannot be disabled, a small purpose-made opaque sticker may help if the device instructions permit it. Cover only the light, never cooling openings, sensors, or controls. Don’t obscure smoke or carbon monoxide alarm indicators or disable alarms. Relocate an unnecessary charging device instead of wrapping the whole unit in fabric.

    4. Treat door light without obstructing the doorway

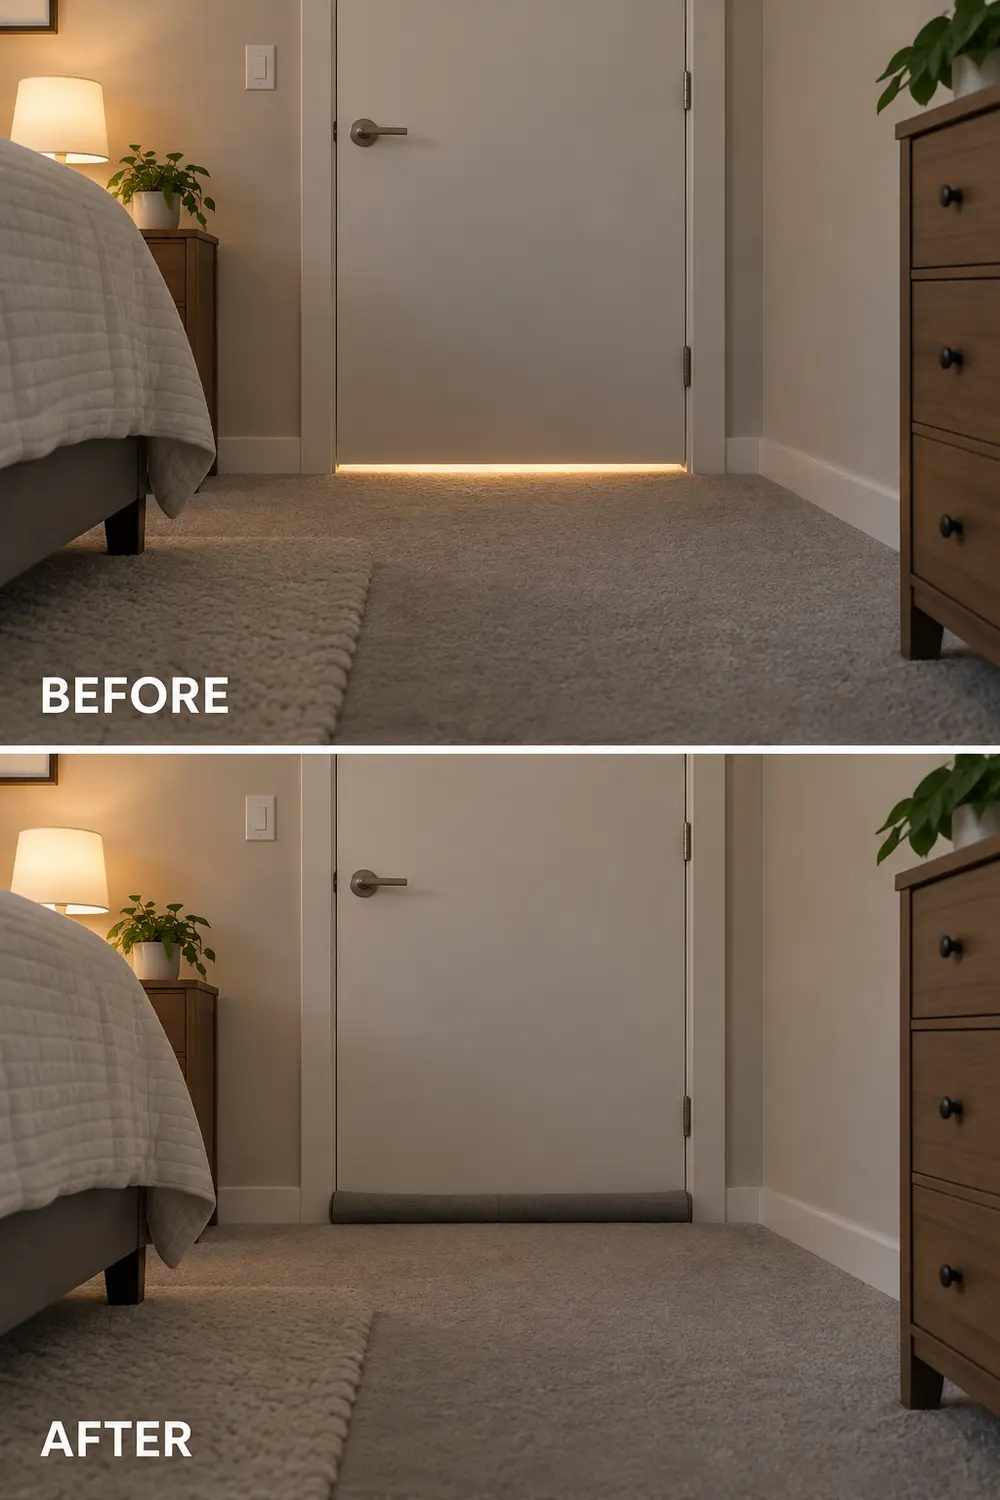
    First ask whether the hallway light needs to stay on during your sleep hours. If it does, inspect where it enters. A lightweight removable draft blocker placed against the bedroom side of the door can reduce a bottom-edge stripe where appropriate. For side gaps, consider only a compatible removable light-blocking strip that leaves the latch and door operation unchanged.

    Before and after comparison shows a removable fabric blocker reducing light beneath the same bedroom door.

    A door gap may be part of the home’s air-return path, so don’t seal it if that would restrict required airflow; ask property management when unsure. Test that the door still opens, closes, and latches normally. Avoid altering a rated door assembly. Skip a floor blocker if it creates a tripping hazard or complicates a quick exit.

    5. Reduce the hallway sounds you can influence

    Listen for the specific interruption before buying acoustic products. If shoes and keys land against the bedroom wall, move their landing spot. If a shared hallway door slams, report the closer to management rather than adjusting building hardware yourself. A washable runner inside your apartment may soften footsteps, provided its backing is secure and it doesn’t bunch at doors.

    Curtains and rugs won’t soundproof a thin door or stop voices traveling through a corridor. A fan or steady background sound may make passing noise less distinct, but keep its volume low enough that important alerts remain noticeable. Position it away from loose fabric, follow its operating instructions, and leave its air intake and outlet unobstructed.

    6. Move your pillow away from the disturbance

    Sometimes shifting the sleeping position is easier than treating another surface. If your pillow sits beside the hallway wall or directly in a curtain-edge beam, try the opposite end of the bed before moving furniture. That simple trial can reveal whether a different bed orientation is worth the work. Check daylight and household noise from the proposed position first.

    Measure the room, bed, door swings, and access routes before rearranging. Keep a usable path to the exit and any emergency-escape window, and follow heater clearance instructions. A quieter corner is a poor trade if the bed traps the closet door; these small-bedroom clearance fixes can help you evaluate the layout without assuming the bed must move.

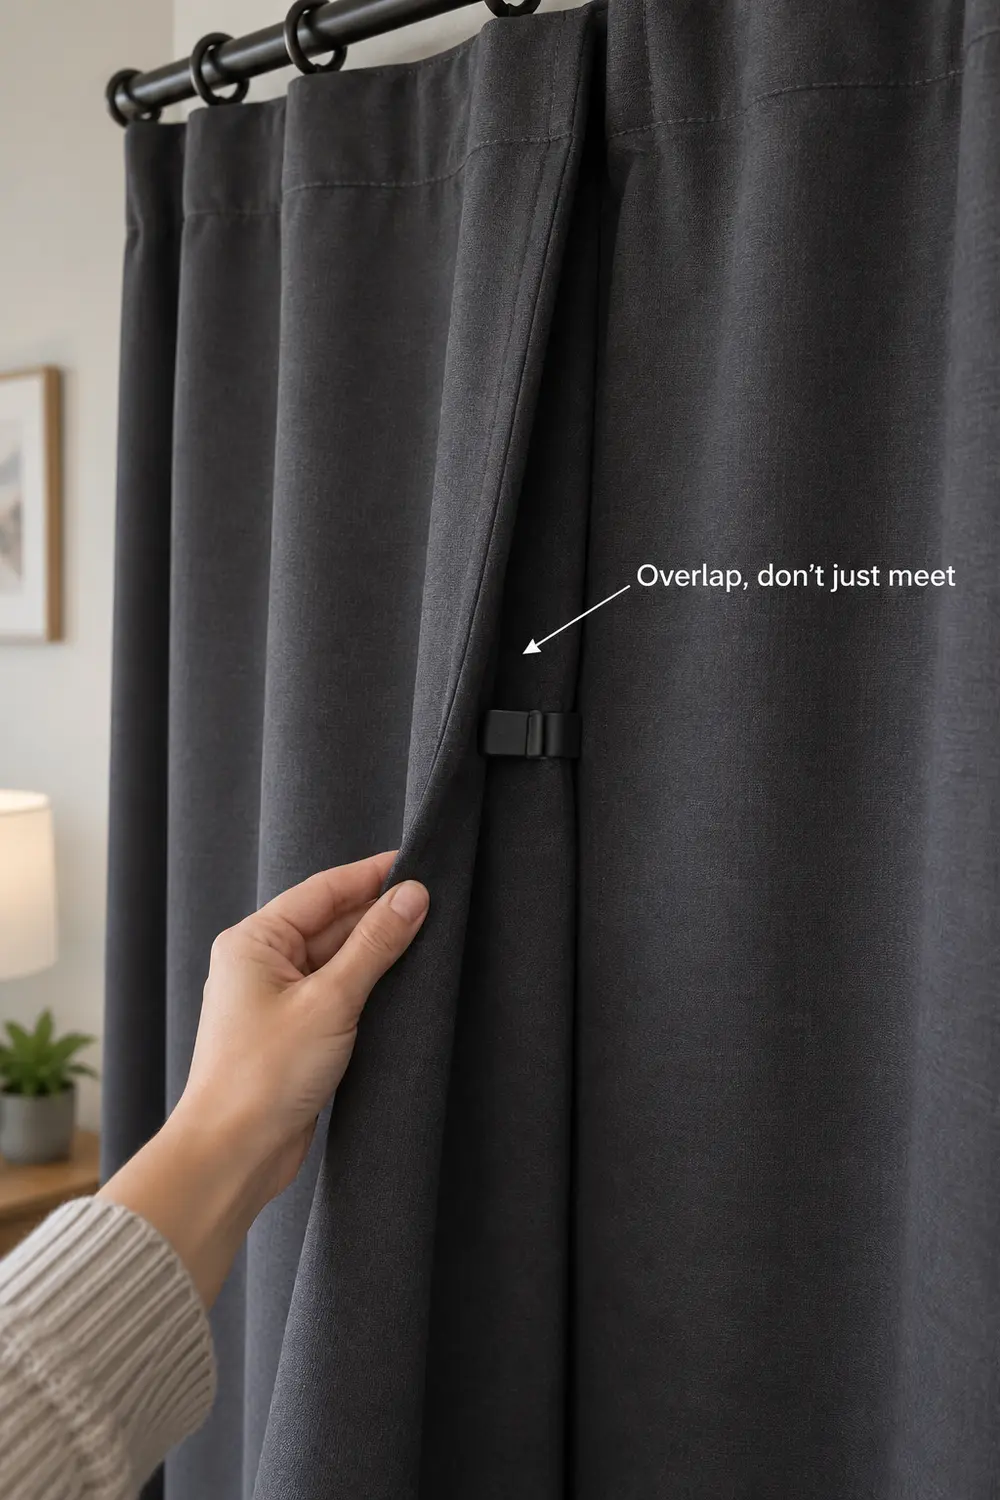
    7. Overlap curtain edges instead of stretching them flat

    If curtains are your main light barrier, inspect their edges before replacing the fabric. Center panels need enough fullness to overlap rather than merely touch. Where the existing hardware allows, bring the outer edges toward the wall to reduce side spill. A removable curtain clip can hold a center overlap during sleep without requiring a new rod.

    Overlapping curtain panels secured with a small clip prevent the center seam from opening.

    An overlap of roughly 3 to 6 inches is a starting point, not a guarantee; test it from the bed. Short panels may still leak light below the sill, while a larger rod may exceed adhesive hardware’s weight limit. Keep curtains clear of heaters and ventilation openings. Don’t tuck fabric around operating hardware or make window access depend on dismantling the treatment.

    8. Separate deliveries from your sleep window

    A dark bedroom cannot prevent a doorbell, an intercom call, or a roommate asking where to put groceries. Move recurring deliveries outside your sleep hours where scheduling allows. Use delivery instructions for an approved drop-off location, and tell household members which packages can wait unopened. Avoid instructions that compromise building security or leave shared exits blocked.

    Create one receiving spot away from the bedroom: a shelf near the entry may be enough for small parcels. These tiny-entry drop-zone ideas can help keep packages, shoes, and bags out of the walking route. In a building without secure delivery space, pickup or a later delivery day may be more practical than silencing every alert.

    9. Agree on specific household quiet hours

    “I’m sleeping during the day” leaves plenty open to interpretation. Give housemates an actual window and identify the disruptive tasks: vacuuming outside the bedroom, speakerphone calls, or unloading clattering cookware. A shared calendar entry or a simple door sign can prevent accidental interruptions. Agree on how someone should contact you for something genuinely urgent.

    Make the agreement workable for everyone. A roommate working from home may still need to take calls, and children or pets cannot promise silence. Shift movable chores rather than demanding an unused apartment. Arrange pet feeding and care before bed, and review the plan when schedules change instead of assuming one conversation will cover every week.

    10. Create a sleep setup you can repeat

    Keep the final routine short enough to use when you’re tired: attach the panel, overlap the curtains, check the door treatment, set phone notifications, and confirm household quiet hours. Store removable pieces together in one slim pouch or basket. A fixed place for clips prevents the daily search that makes an otherwise useful setup feel too demanding.

    A sleeper places a phone face down beside the bed after closing the curtains, with removable supplies stored together.

    Build the wake-up reset into the same routine. Remove or open the panel, restore daylight, and put loose pieces away so the bedroom can function normally again. After several sleep periods, change only the weak point you keep noticing. If hallway conversations still wake you, another layer of window fabric is unlikely to be the useful next step.

    Start with a five-minute check from your pillow at your usual bedtime. Choose one visible light leak or predictable interruption, address it reversibly, and test the result before adding more. The best setup is one you can use daily while keeping airflow, doors, and essential access clear.

  • When the Bed Blocks the Closet: 10 Small-Bedroom Clearance Fixes

    When the Bed Blocks the Closet: 10 Small-Bedroom Clearance Fixes

    A small bedroom can hold a bed and still fail at the everyday basics: opening the closet, reaching a nightstand, or walking out without turning sideways. Before replacing furniture, measure the room, mattress, bed frame, and every door swing, including closet handles. The dimensions below are approximate planning guidelines, not building-code or accessibility standards. Your household may need more space for mobility aids, caregiving, or nighttime movement. Start with the smallest adjustment that restores both closet access and a dependable path to the bedroom exit.

    Small bedroom with a clear path between the bed and open closet, beneath the headline ROOM TO REST.

    1. Recover the Gap Behind the Headboard

    Check whether unused space behind the bed is stealing the inches your closet needs. In an approximately 10-by-11-foot bedroom, moving a freestanding headboard four inches closer to a plain wall can recover four inches at the foot. That may let a closet door finish its swing instead of striking the mattress. Check the frame supports and baseboard before moving anything.

    Do not force the bed against an outlet, crush a cord, or crowd a heater to gain clearance. Bulky headboard legs may prevent the mattress from moving as far as expected. This fix suits a small shortfall, not a door that overlaps the bed by a foot. Preserve any clearance required by heating equipment and keep window operation unobstructed.

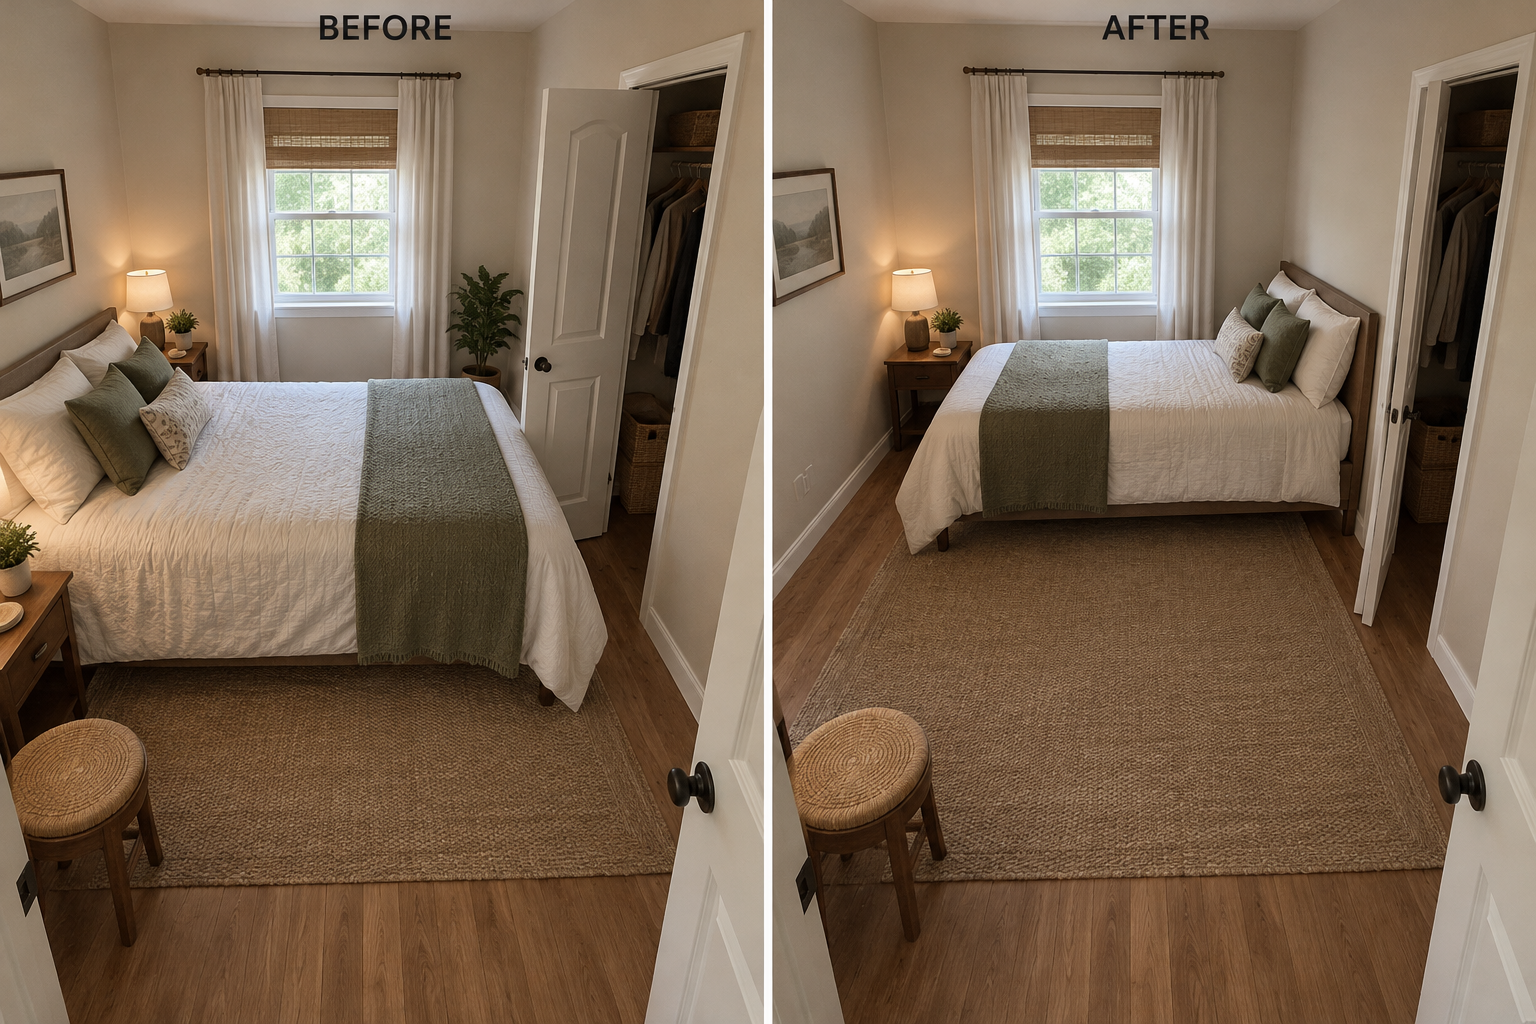
    2. Rotate the Bed onto a Different Wall

    A quarter-turn can move the mattress out of a closet door’s arc without changing the furniture. Sketch both orientations first. In an approximately 10-by-12-foot room with the closet near one corner, shifting a queen bed’s headboard to the adjacent uninterrupted wall may put its narrower side, rather than its foot, beside the closet approach. Test the bedroom entry at the same time.

    Before and after comparison showing a rotated bed clearing the closet door swing.

    Do not assume the longer wall automatically works better. Rotation can solve the closet collision while leaving one sleeper trapped behind the bed or putting a pillow against a radiator. Tape the proposed footprint on the floor and walk around it. Reject the arrangement if opening either door requires moving bedding or squeezing through an unreliable exit path.

    3. Offset the Bed Instead of Centering It

    Symmetry is optional; closet access is not. If the closet sits beside the bed, shift the frame several inches away from it while retaining usable access on both sides. For example, redistributing two roughly 28-inch bedside gaps into about 24 inches and 32 inches may give the closet side enough working room. Confirm the actual door arc rather than relying on those numbers.

    The mistake is treating the narrower side as leftover space nobody will use. A gap that works for one person may be unsuitable for a partner, someone with limited balance, or a caregiver. Try the route at bedtime before committing. Keep the closet-side aisle free of laundry baskets so the recovered width remains available when the door opens.

    4. Choose a Frame That Stays Close to the Mattress

    Measure the outside of the bed, not just the mattress. A queen mattress is approximately 60 by 80 inches, but a padded frame or sleigh footboard can extend well beyond it. Replacing an oversized surround with a straightforward platform may recover several inches exactly where a closet door catches. Compare complete assembled dimensions, including projecting legs, before ordering.

    Slim platform bed frame leaves room for a closet door to open past its foot.

    A frame labeled compact can still have toe-catching legs or a thick headboard. Avoid solving the door collision with a replacement that creates a new nighttime obstacle. Also check mattress support requirements and bed height. Removing a footboard from an existing frame is appropriate only when its construction permits it without weakening the bed; consult the assembly instructions.

    5. Reduce Mattress Size Where It Actually Helps

    When the room is fundamentally overfilled, a smaller mattress can restore meaningful clearance. Moving from a queen to a full typically saves about six inches in width and five in length. That can help a closet beside the bed or beyond its foot. Mark the smaller footprint, including its frame, and test the closet with a person standing in front of it.

    Downsizing is not automatically the economical or comfortable answer: it may require new bedding and a new frame, and two adults may find a full too restrictive. Taller sleepers should consider the lost length. If only width is the problem, compare dimensions carefully; a different mattress format may preserve length, but its frame still needs to fit.

    6. Replace the Closet Door's Outward Swing

    If the bed already has sensible access, changing the closet door may be more effective than moving it. Bypass sliding panels remove the outward swing, while bifold panels reduce—but do not eliminate—the projection. For a roughly five-foot-wide reach-in closet facing the bed, compare both systems using the opening’s actual width, height, and available mounting surfaces.

    Sliding doors expose only part of the closet at once, and bifold handles may still hit the bed. Check whether interior drawers can open behind the proposed panels. Renters need written permission before changing doors or tracks; homeowners should verify suitable attachment points. Neither system compensates for an aisle too narrow to stand in and handle clothing comfortably.

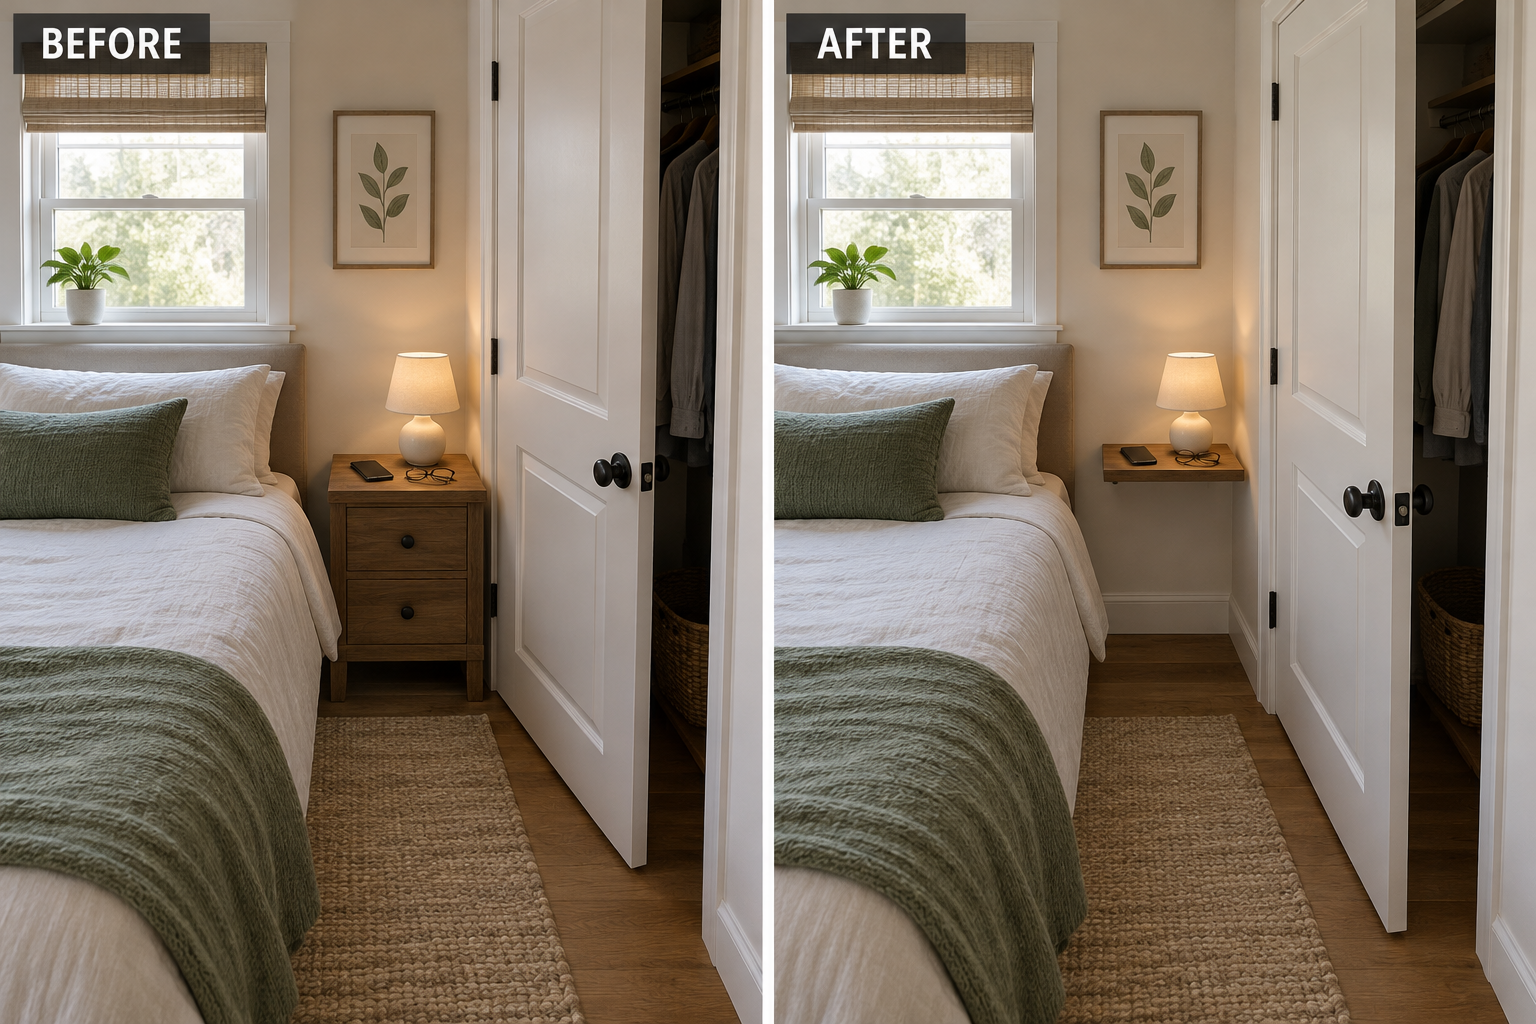
    7. Replace the Nightstand That Blocks the Door

    Sometimes the bed is not the actual obstruction: the nightstand is. If a deep bedside cabinet sits inside the closet swing, replace it with a shallower wall shelf outside that arc. A shelf around eight inches deep can hold a phone and glasses without occupying the same floor area as an 18-inch-deep cabinet. Confirm clearance with the closet fully open.

    Before and after comparison showing a shallow bedside shelf replacing a nightstand that blocked the closet.

    Do not install a shelf where the door handle will strike its edge, or assume a small shelf can safely support anything. Follow mounting and load requirements, and obtain rental permission where needed. This tradeoff removes enclosed bedside storage. If medications, medical equipment, or other essentials require a larger stable surface, relocate the cabinet rather than shrinking it indiscriminately.

    8. Resolve Competing Bedroom and Closet Doors

    Two doors can make an otherwise workable bed position feel impossible. If the bedroom entry opens across the closet approach, ask whether a professionally assessed change in handing or swing would separate their paths. Keep the bed in place while testing the proposed movement on paper. A suitable change can preserve closet access without sacrificing either sleeper’s side of the bed.

    This is not a casual hinge swap. A revised entry swing can obstruct a hallway, collide with another door, or affect required exit arrangements. Get landlord approval and qualified advice about local requirements before altering it. If a safe change is unavailable, choose another layout; leaving the bedroom door partly closed is not a dependable clearance solution.

    9. Use a Foldaway Bed Only with a Safe Daily Routine

    In a bedroom that doubles as a daytime workspace, a properly installed wall bed can make the closet accessible when the bed is stored. Measure both positions, including the cabinet depth and operating area. This works best when daytime closet access is sufficient and the lowered bed still leaves a clear route to the bedroom exit throughout the night.

    Do not choose this solution if lowering the bed blocks the only safe route out or essential nighttime supplies. Installation requires appropriate structural attachment and strict adherence to the manufacturer’s instructions, making it unsuitable for many rentals. The mechanism, lifting effort, and daily reset also matter. A foldaway bed is not useful if household members cannot operate it reliably.

    10. Move the Dresser out of the Closet Approach

    Look beyond the bed for furniture narrowing the closet’s landing area. A dresser opposite the mattress can force you into the door swing just to reach clothing. Move it to an unused wall outside that approach, or relocate some folded storage to another room. Keep the bed fixed while testing this change so you can judge the clearance gained from one move.

    Dresser relocated away from the closet leaves a clear standing area beside the bed.

    Do not move the dresser into the exit path or place it where open drawers trap someone beside the bed. Check drawer extension as well as cabinet depth, and anchor furniture according to its instructions with appropriate rental approval. Underbed drawers are not an automatic substitute: they also need opening space and can recreate the same conflict at floor level.

    The best arrangement lets you open the closet, reach everyday belongings, and leave the room without moving furniture first. Measure the complete bed, test every door and drawer, and walk the proposed layout before buying anything. A few recovered inches may be enough; when they are not, prioritize comfortable sleeping and reliable circulation over symmetry or extra storage.

  • No Space for Nightstands? 10 Bedside Storage Solutions for a Small Bedroom

    No Space for Nightstands? 10 Bedside Storage Solutions for a Small Bedroom

    A small bedroom doesn’t need matching nightstands to feel comfortable and organized. It needs a reachable place for your glasses, water, phone, and whatever helps you settle in. Start by checking what you actually use overnight, then measure beside, beneath, and behind the bed. All dimensions below are approximate planning guidelines, not clearance requirements. Test your reach from your usual sleeping position, and keep doors, exits, heating equipment, and everyday walking routes clear.

    Small bedroom with a slim bedside table, fabric mattress caddy, and clear walking space.

    1. Choose a Slim Pedestal Table for the Essentials

    A small pedestal table gives you a landing spot without the bulk of drawers and four corner legs. Look for a top roughly 8–12 inches across, then measure the base separately. Beside a low bed, a compact metal table can hold glasses, a phone, and a small water bottle while leaving the surrounding floor visually open.

    Don’t assume a narrow top means a narrow footprint: some bases spread well beyond the surface. A lightweight table may also tip when bedding catches its edge. Choose a stable design, avoid placing breakable drinks near the rim, and skip this option if children, pets, or balance needs make a small movable surface unreliable.

    2. Tuck a Fabric Caddy Beside the Mattress

    A mattress caddy turns the bed’s side into soft storage for lightweight essentials. Choose a model designed for your mattress and frame, then position its pockets near your shoulder rather than down by your knees. For example, give glasses their own soft pocket, slide a paperback into the largest section, and keep the phone pocket easy to reach.

    Before and after showing bedside essentials moved from the bed into a mattress caddy.

    Overloading the pockets is the usual mistake; a heavy bottle can pull the caddy loose or make it sag. Check how its support flap works with adjustable bases, slats, and mattress protectors. Keep charging devices uncovered and cords outside the bedding. This solution suits small objects, not hot drinks, bulky equipment, or anything that needs a rigid surface.

    3. Slide a C-Shaped Table Under the Bed

    A C-shaped table can bring its surface over the mattress edge while its base slides underneath the bed. Measure the underbed height and check for center supports before choosing one. In a tight room, a small rectangular top can sit beside your pillow at night and move outward when you need to change the sheets.

    The catch is compatibility, not just width. Platform beds with solid plinths, low rails, or storage drawers may leave nowhere for the base to go. A top positioned too far over the mattress can also obstruct getting up. Test the arrangement with your bedding in place, and don’t treat the table as a support handle.

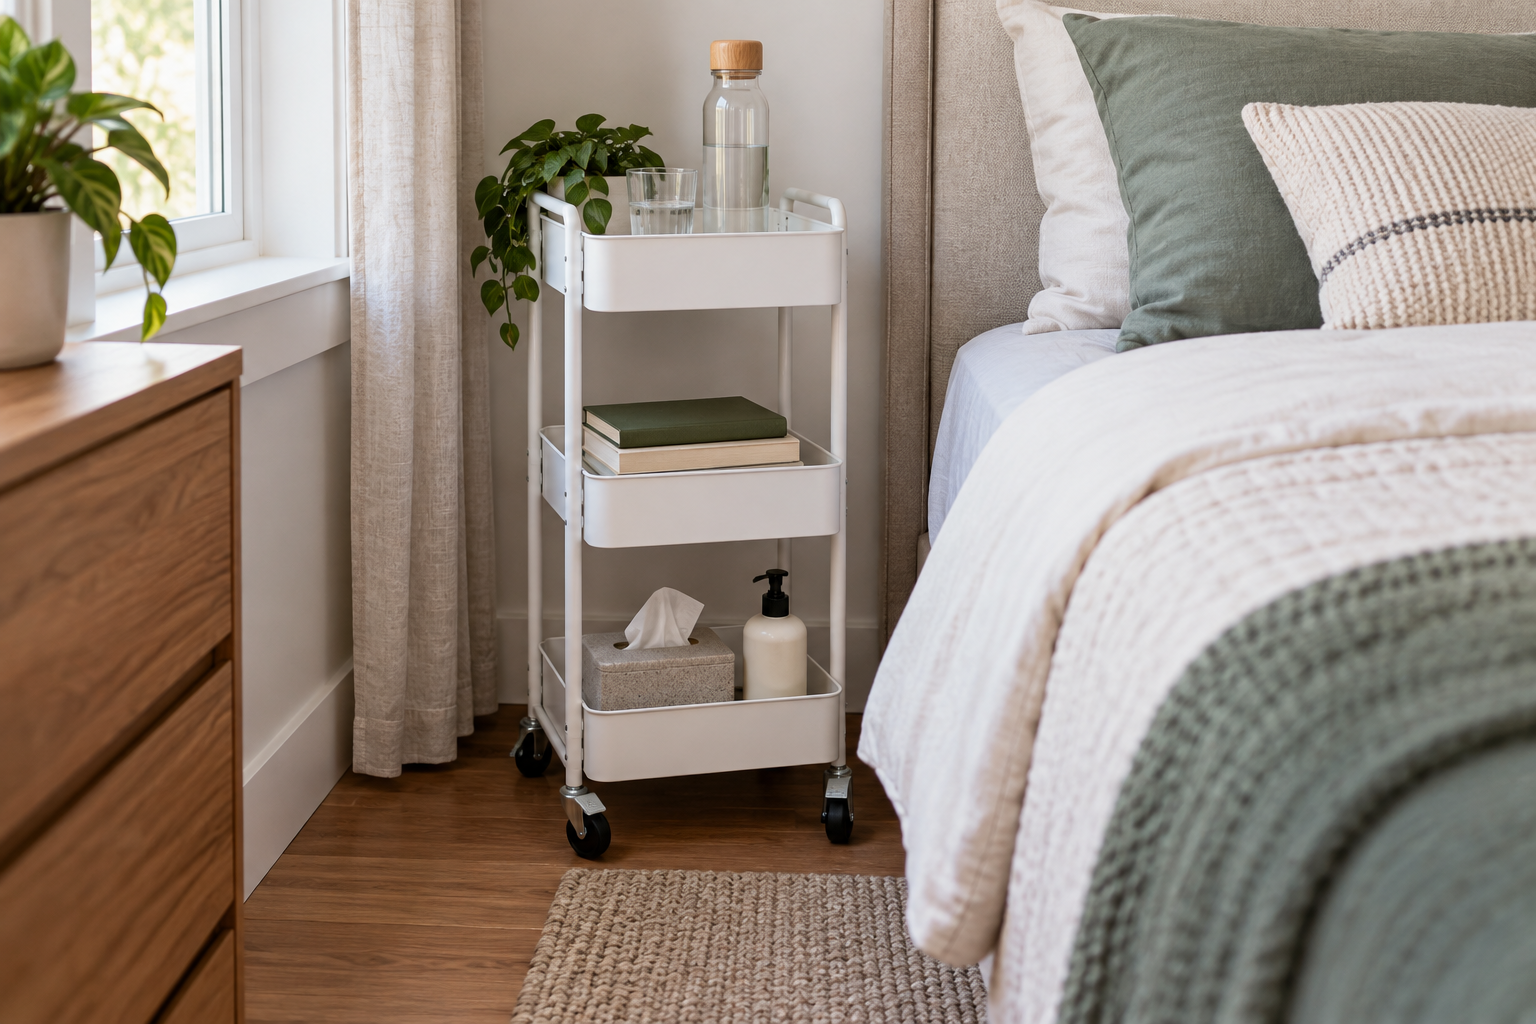
    4. Park a Narrow Rolling Cart Beside the Pillow

    A slim rolling cart stacks storage vertically without requiring wall holes. Use the top tier for your nightly essentials, the middle for books, and the bottom for spare tissues or lotion. A cart around 6–10 inches wide may fit an awkward gap, but measure its handles and wheels, too. Lock the casters whenever it is parked.

    Narrow rolling cart organizing nighttime essentials across three tiers beside a bed.

    A cart fails when it fills the only usable path or becomes difficult to move on thick carpet. Keep heavier supplies low, and don’t run a charging cable across its wheels. Leave required space around heaters and other equipment according to their instructions. If the cart must move every time you leave bed, choose something smaller.

    5. Attach a Tray to a Compatible Bed Frame

    A clamp-on bedside tray provides a small surface without using floor space or drilling into the wall. Measure the exposed bed rail’s thickness and shape, then match those measurements to the tray’s stated limits. On a compatible wooden frame, a padded clamp can support a phone, glasses, and a lightweight cup within easy reach.

    Don’t improvise a clamp connection on upholstery, a thin decorative rail, or a moving bed mechanism. Follow the tray’s load limit and check that tightening it won’t damage the finish. Skip this approach if the attachment loosens, projects into your exit route, or encourages someone to push down on it while standing up.

    6. Let an Existing Dresser Do Bedside Duty

    Sometimes the best solution is moving the bed rather than buying another piece. If a low dresser already sits nearby, arrange the bed so one corner of its top is comfortably reachable. Reserve that corner with a shallow tray for nighttime items, and use a small section of the nearest drawer for less-used bedside supplies.

    Height and drawer access determine whether this works. A tall dresser may require an awkward upward reach, while a mattress pressed against drawer fronts makes storage frustrating. Preserve room to operate the drawers and follow the dresser manufacturer’s anchoring instructions. In a rental, obtain permission for required anchoring rather than leaving furniture unsecured.

    7. Install a Shallow Ledge with a Clear Cable Route

    Where your lease allows mounting, a shallow wall ledge can hold essentials above an otherwise unusable bedside strip. Position it beside the mattress, not over your pillow, and test the height before installation. Add compatible cord guides along the wall so a charging cable reaches the ledge without dangling across the bed or collecting on the floor.

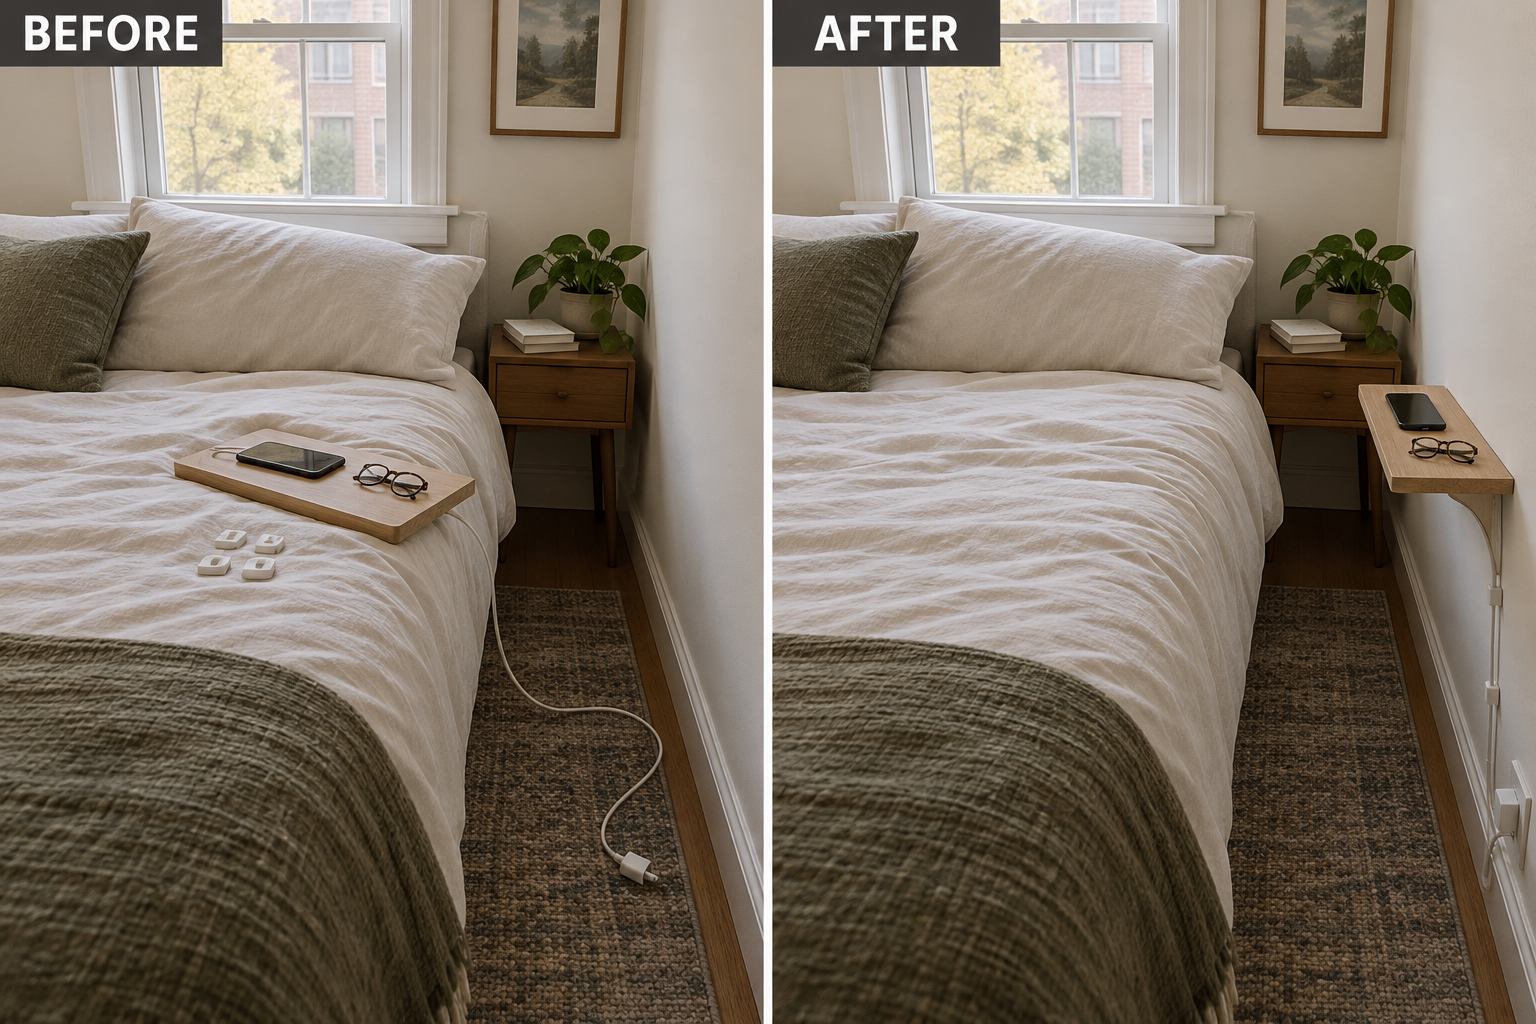
    Before and after showing a shallow bedside ledge installed with a neatly guided charging cable.

    Don’t assume adhesive strips can support a loaded shelf; use mounting hardware appropriate to the wall and the manufacturer’s instructions. Cable clips can also damage rental paint, even when marketed as removable. Keep cords unpinched and charging devices ventilated. If permission, wall construction, or a safe outlet route is uncertain, choose a freestanding solution instead.

    8. Use a Head-End Underbed Drawer for Backup Supplies

    A shallow rolling drawer near the head of the bed can replace the storage portion of a nightstand. Measure beneath the frame and allow enough side room to pull it open. Store tissues, spare reading glasses, or a bedtime book inside, with frequently used items at the front. Close it completely before settling in for the night.

    This is backup storage, not a good place for something you need instantly while lying down. Repeated bending may be uncomfortable, and an open drawer becomes a nighttime obstacle. Avoid trailing pull loops and loose charging cables underneath. It’s unsuitable when a rug blocks the wheels or the bedside gap cannot accommodate the drawer’s full travel.

    9. Replace a Nightstand with a Small Storage Stool

    A compact storage stool combines a nighttime surface with a place to stash spare bedding or sleep accessories. Choose a stable model with a firm, flat top; some upholstered versions need a fitted tray. Beside a modest-height bed, it can hold your glasses overnight and provide an occasional seat while you put on socks.

    The tradeoff is access: everything on top must move before you open the compartment. Store occasional-use items inside rather than nightly necessities. Confirm that the stool is designed for sitting if you intend to use it that way, and avoid wheeled or rounded designs that shift easily. Soft, uneven tops are poor resting places for drinks.

    10. Choose a Bed-Integrated Headboard Shelf

    When replacing a bed frame, consider a compatible headboard with built-in shelf storage. A low ledge extending beside the pillow can hold glasses and a book without separate nightstands. Measure the complete bed’s depth, not just the mattress: even shallow headboard compartments can shift the mattress forward. Favor reachable side cubbies over deep shelves behind your head.

    Bed-integrated storage headboard with shallow side cubbies replacing separate nightstands.

    Don’t wedge an unrelated shelving unit behind the mattress and assume the bed will stabilize it. Use a compatible system assembled as instructed, including any required anchoring and rental permission. Keep heavy objects away from sleeping heads and check cable openings for pinch points. This option makes less sense when the existing bed works well or room depth is already tight.

    The best bedside storage fits both your room and your nighttime habits. Choose one reachable spot for daily essentials, then give backup supplies a separate home. Before committing, measure the full footprint, try the reach, and check cords and walking routes. A small, dependable setup is more useful than squeezing in a conventional nightstand.